So who else watched the BBC2 programme The Great British Sewing Bee (www.http://www.bbc.co.uk/programmes/p0165nj8) the other night? I was really looking forward to this programme as I had seen a call out for participants last year and briefly, but only briefly toyed with the idea of entering. I know I am a coward, but even though I know I could make the things on the programme, in the back of my mind was “what it I messed up and the judges were crushingly and humiliatingly rude to me like on some of the other reality shows?” This put me off entering but not from watching.
The first challenge, the A line skirt is a simple enough task on the face of it; the reality can be very different as I am sure that anyone who has ever tried to make clothes will agree. The secret to great looking handmade garments is care when cutting, lots and lots of pressing (it’s pressing not ironing) to keep seams and darts smooth and flat, and keeping your stitching even. Most dressmaking classes usually use the A line skirt as the first project because it tests skills in accurate measuring, cutting, straight line sewing and importantly fitting a zip. It was good to see the participants using a variety of different fabrics for their skirts, just because the pattern suggests using cotton or wool blends doesn’t mean you have to, one of the fun things about dressmaking is experimenting with different types and weights of fabrics for the same garment.
The second task allowed for a bit of creativity to sneak in with varying results and we began to see the difference is abilities, but it was the made-to-measure dress was the decider. It was interesting to see that a commercial pattern was the basis and that they had all had the opportunity to make the garment prior to the competition, this to my mind kind of suggests that people should know what they are doing. If it was me I would have made it up several times for different people so I knew exactly what I was doing on the day! Is that cheating? I don’t think so, preparation and planning and all that!
I think the judges were right to send Michelle home though, her reversible frock while a lovely idea was totally ridiculous for a competition like this and it was obvious that she had no idea about the characteristics of silk, which can be very difficult to work with; I speak from experience here as a couple of years ago I made my youngest daughter a 2 piece graduation dinner outfit from silk. It is based on a 50’s style prom dress with a little shrug/bolero style jacket, and I had to make various fitting alterations like on the programme. The finished outfit looks fine when freshly pressed, but as soon as it is worn it starts to wrinkle a bit, a slightly different weight of silk might have helped, oh well too late now and she has worn it loads, so it can’t be that bad! I love the colour of the silk which I got from Beckford Silk in Gloucestershire (mail order), we had been looking for ages to find fabric that picked up the colour of her fabulous Irregular Choice shoes bought specially for the dinner.
 Kat wearing her 50’s style grad dinner outfit and amazing Irregular Choice shoes
So what did I think of the programme? Well it followed a typical tried and tested format with ‘chalk and cheese’ judges and a suitably ‘pc’ selection of contestants. I have seen some other bloggers suggest that it would have been better with only very experienced sewers taking part, I disagree, I think that the whole point is to capture the current enthusiasm for stitched crafts and also to show that anyone can sew if they put their mind to it. I understand some other bloggers comments that possibly Sandra should have won the fitted dress challenge, but while her dress was very well made it was also very ‘matronly’ and not very modern at all, while Mark’s panel shift frock may have had some puckered seams but it was a much more modern piece and made great use of the fabrics he had chosen – a deserved win in my book.
The Laundry Bag Project
The project challenge in the middle was an odd one, make a laundry bag. I read on other blogs that people don’t seem to understand this project inclusion. I think it’s to encourage complete novices or those sewers who lack confidence to make a simple project piece which tests the basic skills – pattern, cut, straight line stitching, pressing and finishing. of course this type of bag can be made in different sizes, with or without the base or side pieces to make all manner of useful bags such as gym kit bags, book bags, somewhere to keep tights/socks/fabric stash whatever. I had a go at making the bag using the instructions from the Radio Times (they can also be found at http://www.radiotimes.com/news/2013-04-02/the-great-british-sewing-bee-make-a-laundry-bag).
I used a piece of decorators weight cotton (the sort used for curtains or upholstery) printed with a toile de jouy pattern in pale blue. I drew, then cut out the various pattern pieces needed from the instructions in the Radio Times and then pinned these to my fabric ready to cut out. And at the outset I fell at the first hurdle, I was taught that if you are making something that will be washed, you should always wash your fabric before you cut it up, this is because fabrics often shrink, even very slightly, when washed and can cause problems with twisted seams – have you ever bought a T shirt, washed it and found the side seams have twisted round to the front? This is because the fabric was not pre-washed and uneven shrinkage has taken place.
fabric and instructions ready to go paper pattern & fabric cut out ready to sew
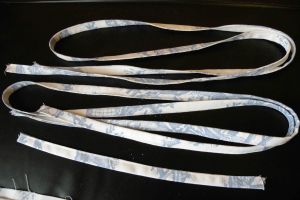
So off we go, or should that be off we sew! First make up the drawstring ties, the online tutorial recommends using a bias binding maker to do this, but I did it the old-fashioned way by first pressing the strips in half, opening them out again and then folding each side to the middle, press flat then fold in half again and press flat. Now they needed to be stitched closed.
pressed draw strings ready to sew finished sewn draw strings
Next stitch the bag sides to the bag front and back, being sure to leave a gap in the seam through which the draw strings will be threaded – interestingly this simple but fundamentally important part was omitted in the TV programme instructions! Once sides and front and back are stitched together, add the base and you now have a sort of fabric box shape. Press all seams open and flat. Time to turn the top over and hem, then fold down and stitch to make the draw string channel. Finally add the hanging loop and finish with a square to hide ends of hanging loop, the tutorial suggests using a square of grosgrain ribbon, but I decided to use a square of the same fabric.
back and sides ready for stitching square of fabric to cover hanging loop ends
Once done, press again, thread the draw strings through and TaaDahhh – one draw string bag. Simple! (Now the question is, will I ever actually use it!)


